When 10th edition Warhammer 40k was released, Peter told us what he would do with Orks in the new edition. Despite being a primarily Age of Sigmar site, this has proven to be a popular article and so (eventually) I am expanding the series.
As with all these articles, there are some affiliate links for Element Games (UK) and Amazon (US) if you want to buy them. But Bricks and Mortar first! You’ll miss your FLGS if it shuts down.
Combat Patrol Blood Angels
Like the other boxes the Combat Patrolbox is filled with goodies and makes for fantastic savings when you’re starting out in collecting an army for 40k. They are RRP of £100 (US/UK), but most FLGSs provide a discount on this.
Inside the box you get:
Blood Angel Captain (£26) 10 x Assault Intercessors (£40) 6 x Sanguinary Guard (£74) Blood Angel Upgrade Sprue
That’s a total of £140 if you were buying these kits separately, meaning you get a saving of £40.00. Plus the upgrade sprue.
Total So Far
This is 490 points towards our target of 1,000 points.
Getting to 1,000 points
To get the Blood Angels Starter Army to 1,000 points we’re going to add a few extra units that’ll give you something different to paint and increase your speed towards the enemy.
This gets us to 975 points, and if you are worried about Tactical Squads disappearing in a future edition just swap them out for an Intercessor Squad.
Codex Costs
As everyone who buys from Games Workshop knows, once you’ve got the models you’ll need the Codex. For Space Marines that normally means two are required. And Blood Angels are no exception, so you’ll need Codex: Space Marines (UK/US), and Codex Supplement: Blood Angels (UK/US). Total £57.50 (Ouch!)
Total so far at RRP: £318.50 (not cheap, but remember this is Space Marines, and the second-hand market is worth looking at either locally or on Ebay)
An HQ choice is mandatory, included in the Combat Patrol, and gives you a nice model to lavish your new painting scheme on. Paint the Tactical Squad or Intercessors first to get a scheme you like though. Don’t expect miracles from him, but he’ll be able to attack smaller units and hold up larger ones.
Tactical Squad
Tactical squads are great for holding objectives, and their bolters can kill many opponents with low or limited saves. If you are concerned about the old armour disappearing in the near future, you can use Intercessor Squads for these instead.
Assault Intercessor Squad
Iconic Blood Angels (and included in the Combat Patrol box) these guys are great at assaulting the enemy and throwing out a volume of attacks. They can force the enemy to react by getting near them, but they are slow… so…
Rhino
The Intercessors get a Dedicated transport to get them to the enemy quicker, and get killing sooner. Don’t expect it to survive a direct hit from Lascannons, but the speed here is essential to get the most out of the Intercessors.
Baal Predator
Iconic! A close assault predator which will rip through enemy troops. Don’t expect it to hurt other tanks though so you need to be a little careful with deployment and moving. Keep it near the Rhino and you’ll be able to break through a lot of what will stand against you at 1,000 points.
Dreadnought
Whilst I have chosen the ranged Dreadnought here to provide some anti-tank firepower, any Dreadnought can be used in this force. Ebay (UK/US) is a great place to pick up Dreadnoughts as they are often in starter sets. This is also a way to save some money.
Sanguinary Guard
6 Sanguinary Guard form your hammer. With their Jump Packs they will get to the enemy quickly alongside your Rhino and Baal Predator and their or spears can rip into the enemy on the charge.
Another iconic unit and another painting scheme to learn as well.
WHAT NEXT?
If expanding the Blood Angels Starter Army to 2,000 points I would definitely pick up another Combat Patrol box set, and augment the Sanguinary Guard with Jump Pack Assault Intercessors.
Another Iconic unit is the Death Company, and they are great if you want to try painting and highlighting black.
Alternatively, if you like the way the tanks play pick up a Land Raider Crusader as another transport vehicles and put the second unit of Assault Intercessors in it.
I hope you enjoyed this Blood Angels Starter Army article. How would you build a 1,000 point list from the Combat Patrol Box? There may well be aspects of the codex or units that I have not included that you think should be, so why not let us know in the comments below.
Blood and Gold! Welcome to the best army in Age of Sigmar! With 4th edition of AoS chugging along it’s a great time to get into it by grabbing a Spearhead box to try out that fun format, and then build off of it to a bigger 1k game!
With that as our mission today, let’s take a look at the Fyreslayer Spearhead box.
Spearhead Contents
– Battlesmith – 5 Hearthguard Berzerkers with Flamestrike Poleaxes – 10 Vulkite Berzerkers with Fyresteel Axes
Building the box contents with Spearhead loadouts in mind, we’ve got 490 pts to start with. Halfway there! Now you could buy a second spearhead box and swap out the hero to get close to 1k, but that’s a boring answer, so let’s look at what else we can do.
The 1,000 pts List
Fire and Gold! 940/1000 pts —– Grand Alliance Order | Fyreslayers | Warrior Kinband Drops: 2 Prayer Lore – Zharrgrim Blessings Manifestation Lore – Magmic Invocations —– General’s Regiment Auric Runefather (140) • General • Ash-cloud Rune Battlesmith (100) • Ash-beard Hearthguard Berzerkers with Flamestrike Poleaxes (260) • Reinforced Vulkite Berzerkers with Fyresteel Weapons (130) — Regiment 1 Auric Runemaster (180) Vulkite Berzerkers with Fyresteel Weapons (130) —– Faction Terrain Magmic Battleforge
There’s some value boxes other than spearhead out there for Fyreslayers, if you can get your hands on the dawnbringers box that’s a good one to sort out infantry needs, or the great Start Collecting box for close to its original price. But that’s all contingent on what your local LGS might still have on the shelf or what you can find second hand, so with the idea of making a buy list anyone could pick up today, here’s where we’re at.
Now in Age of Sigmar 4th edition , some factions have faction terrain and spells that can be summoned to the tabletop. Now fyreslayers don’t use no cowardly magic, they use prayers to Grimnir like true Duardin but that means you’ll need to get the invocations box and the forge (also affectionately known as the pizza oven) to aid your little guys. While not 100% necessary if you’re on a budget, they’ll come in handy for when you want to try out more of the game and definitely something to have in your arsenal when going to 2k points. You can also try and find base sizes that work for proxies to keep balling on that budget, so I included costs for the units and a separate cost for both units and terrain + invocations.
For the UK, you’re looking at £276 straight from GW for everything, or £219.50 for just units. And across the pond it’s more like $450 from GW for all the units plus the terrain piece and Magmic invocations or $358 for just the units.
Good news is the Magmadroth box will build our little foot Runefather as well as a Runeson and Runesmiter, with one of the latter as a potential rider for the Magmadroth, so with all this picked up you’ll have 380-400 points after you build either combo option on top of this 1k list.
The List
Let’s look over what we’ve got and why. I won’t go into the super nitty gritty of the faction, fellow Woehammer writer, and Fyreslayer player extraordinaire Kuhal did a great write-up on the faction and the datasheets when the edition dropped here. Some points change, and bodyguard change options have happened since then, like Field Sergeant helping our mobility issue, but the core of all of that remains the same, so I won’t rehash it here. The biggest thing is to keep track of your rune activations. That’s where the Fyreslayers truly shine, as much as they appear to be a run and smash army they’re actually a “wait for the right time” run and smash army with some defensive tricks. And just to contradict everything I just said, the battle formation I went with gives all your infantry (this entire list) +1 to hit on the charge, which really increases their output (I did mention timing things right though). Anyway, on to the units.
Auric Runefather
Credit: Games Workshop
That’s right, Kingdom Hearts fans, that’s not a key sword, it’s a key AXE, and it hits like a truck. The Runefather is the lord of the Fyreslayer lodges, and he shows it with his whopping Rend 2 Damage 3 weapon. Aside from fun smashing times, he’s here to dish out buffs. Commanding presence gives nearby infantry an increased control score depending on the game round. This can seem just ok in early rounds, but later on, it can come up clutch.
His other big deal is the Royal Retinue ability. At the start of the game you pick a non hero unit in his regiment (so the berserkers or vulkites) to add 1 to hit rolls and both the unit and this might hero get a 4+ ward as long as they stay together. I normally put this on the berserkers to give them that extra killing power, but they get a ward buff being near a hero anyway so sometimes getting that extra protection on your vulkites can make those naked guys even harder to shift.
In this list he’s also equipped with the Ash Cloud Rune artifact, giving a once per game “you can’t shoot my footslogging dwarves” aura to help you close the distance before cowardly ranged units (*cough* ELGI *cough*) can rain death on you.
Battlesmith
Coming in from the spearhead box is the battlesmith, a nice buffing piece with a high control score to hold points behind some helpful units and bring them back with extra rally dice to keep the pain train chugging along thanks to Bard of the Lodge.
Giving off an aura of ignoring negative modifiers to control score is just icing on the cake, especially if you overlap it with the Runefather’s ability to increase it. I gave him the Ash-Beard heroic trait to make him a priest since he’ll be near the action but not right in it, hopefully helping rallies out and giving -1 to wound prayers on your dwarves, but there’s a good argument to giving it to your Runefather so he gets prayers or the Runemaster to get better at praying.
Auric Runemaster
Speaking of, this guy will be one of your best buddies as you grow your fyreslayer army. He’s a 2 chant priest, which is great for your zealous slayers, but also, every time you successfully get a prayer off, he builds a “good job” token (even for magical intervention). Once he gets to 3, you can spend them and those nice rune buffs you get go into overdrive for a second. Knowing when and where to spend those tokens is key to getting the full punch out of your little guys. Keep him by the forge for a +1 to those chants so he’s even better at his job, and lets him unbind 1 spell as if he were a wizard, something your army doesn’t have.
Hearthguard Berzerkers with Flamestrike Poleaxes
These guys are your hammers, and I like to have the unit be a reinforced one of 10 to help survivability and to give them extra punch. The broadaxe variant is also great but I’m working as if you built them as the Spearhead format recommends.
Either way they’re still share Duty Unto Death, giving out a 5+ ward to themselves and any hero they buddy up with if they stay nearby, and the crit mortals with damage 2 is sweet. The mortals at the end of the turn is just gravy in the unlikely event you didn’t finish something off in the first swing.
Vulkite Berzerkers with Fyresteel Weapons
Finally, these little guys are your objective takers and battle tactic go getters in this small list. It’s tough with how slow they can be but they do pack a punch if they make contact with something and help fill out the board with some of your dudes which is why I left them as two units rather than reinforced for the 1k list. Normally I prefer the sling shield variant and reinforcing them to a 20 man (or dwarf) unit to make them a real nuisance but as to unit size, I covered that, and Spearhead format again has them built as dual axe wielding maniacs, and who am I to argue with that.
By the fires of Grimnir!
This should be a great foundation for your Fyreslayer army and includes a lot of key units we’ve seen for full 2k 4th edition lists. Once you get some more games under your belt you might see some changes you’d make (if so let me know!) or see what cool things you can add to make it to a full 2k (try the magmadroths out, trust me). Either way, I look forward to seeing a new Runefather across the table from me at some point!
When 10th edition Warhammer 40k was released, I had a crack at what I would do with Orks in the new edition. Despite being a primarily Age of Sigmar site, this has proven to be a popular article, and so (eventually) we’re expanding the series.
As with all these articles, there are some affiliate links for Element Games (UK) and Amazon (US) or Frontline Gaming (US) if you want to buy them. But Bricks and Mortar first! You’ll miss your FLGS if it shuts down.
Spearhead: Kruleboyz
Like the other boxes, the Spearheadbox is filled with goodies and makes for fantastic savings when you’re starting out in collecting an army for Age of Sigmar. They are RRP of £87.50 (Affiliate link with Discount US/UK), but most FLGSs provide a discount on this.
Inside the box you get:
Killaboss on Great Gnashtoof*
Murknob with Belcha-banna*
Beast-skewer Killbow (£24)
3 Man-skewer Boltboyz (£34)
10 Gutrippaz (£37)
That’s a total of £85, but it includes two models you can’t purchase separately (Killaboss on Great Gnashtoof and Murknob with Belcha-banna) unless you bought the Age Of Sigmar 3rd edition starter sets. While the cost is similar to buting the kits you can get on GW, you do get those two additional kits for free essentailly.
Total So Far
This is 680 points towards our target of 1,000 points.
Getting to 1,000 points
To get the Kruleboyz up to 1,000 points, we’re going to add a few extra units that’ll give you something different to paint and give you a little extra punch.
Swampcalla Shaman with Pot-grot £24 (Affiliate link with Discount US/UK)
2x Kruleboyz Monsta-killaz £37each (Affiliate link with Discount US/UK)
2x Man-skewer Boltboyz £34 each (Affiliate link with Discount US/UK)
Orruk Warclans: Manifestations £35.50 (Affiliate link with Discount US/UK)
Bossrokk Tower £40 (Affiliate link with Discount US/UK)
Dropping the Murknob with Belcha-banna and the Killbow (trust me, you’ll thank me later), this gets us to 1000 points on the dot, and also gives us a couple of spare units to swap in and out.
BattletomeCosts
As everyone who buys from Games Workshop knows, once you’ve got the models, you’ll need the Battletome. So you’ll need the Orruk Warclans Battletome for £37.00 (Affiliate link with Discount US/UK).
Total so far at RRP: £363.50 (not cheap, but remember this is Games Workshop, and the second-hand market is worth looking at either locally or on Ebay, a lot of these models such as the Man-skewer Boltboyz can be purchased cheaper after featuring in the Dominion 3rd edition starter box). Plus with online gaming stored offering 15% (or sometimes greater) you could get this for roughly £300.
This sneaky brute is a top pick for your general, he’s mean, mobile, and made for mayhem. He’s itching to scrap, so we’ve kitted him out with Mork’s Eye Pebble, giving him and all friendly Kruleboys units wholly within 12″ Ward(5+) for a turn.
To really get the most out of him, pair him with another Kruleboys unit. That unlocks That’s Ours, Ya Gitz!, giving both units +1 to hit if they’re contesting an objective they don’t control. Even better, that supporting unit gets +3 to their Control Score thanks to All Part of Da Plan.
And if things start going south, don’t worry, this Killaboss is a proper Slippery Skumbag, letting him Retreat at the end of the combat phase without taking mortal damage. Perfect for avoiding those sloggy punch-ups and living to krump another day.
Gutrippaz
Painted by Peter
Gutrippaz aren’t just here for the intimidation, opponents often sleep on them, but these lads have surprising bite. Their weapons come with Crit (Mortal), dishing out mortal wounds on hit rolls of 6. But when you juice them up in the Hero phase with Venom-encrusted Weapons, those mortal wounds trigger on a 5+ instead. Ten models swinging two attacks each? You’re looking at 6–7 mortal wounds on average before your opponent even starts rolling saves. Nasty stuff.
And they’re not just good at dealing pain, they’re slippery too. With Scare Taktikz, enemy units (non-Heroes) that dare strike back do so at -1 to hit on a 3+. It’s a psychological game, and these boys are playing it like pros.
Monsta-Killaz
Painted by Peter
Monsta-Killaz are Gutrippaz even nastier cousins, and even better. Like the Gutrippaz, they’ve got Crit (Mortal) baked into their attacks, but each one throws out 3 attacks instead of 2. That’s more stabs, more chances for mortals, and a whole lot more regret for whatever’s standing across from them.
They also pack Anti-Monster (+1 Rend), making them a nightmare for big beasties. Toss in Venom-encrusted Weapons in the Hero phase and you’re fishing for mortals on 5+ instead of 6+. With 7 models, that’s 21 attacks, just enough to match (or beat) 10 Gutrippaz for 6–7 mortal wounds on average. Efficient and brutal.
But they’ve got brains behind the blades too. With the Klutcha-Grot token, you can shut down an opponent’s Monster Rampage on a 2+ — though roll a 1, and the poor grot gets squished (and you lose the chance to do it again). And if you’re facing off against a Monster, Bait and Trap lets you force it to Strike Last on a 3+, buying your boyz the all-important first swing.
Swampcalla Shaman with Pot-grot
Painted by Peter
He’s no Arcane Wunderkind, but the Swampcalla Shaman brings the weird juice the Kruleboyz need to grease the wheels of war. While he won’t win a spellcasting contest anytime soon, he’s got a few tricks bubbling in the pot.
In the Hero Phase, if he’s still got his trusty Pot-Grot token, you can add +1 to his casting roll, just don’t roll a 4 or less, or the poor grot gets cooked and your bonus vanishes. He also carries Foul Elixirs, letting him hand out a +1 save buff to a friendly unit on a 2+. But roll a 1, and your lads drink the wrong brew and suffer D3 mortal wounds instead. Risky? Sure. Worth it? Perhaps.
The Kruleboyz spell lore has some real swampy gems:
Choking Mist slows the enemy down and reduces their attacks.
Da Black Pit deals a few mortal wounds from afar.
And Mork’s Kunnin’ will increase the save of a nearby Kruleboyz unit.
We’ve gone with the Manifestations of Gorkamorka to keep things thematically muddy, but a Krondspine Incarnate works just as well if you’re after raw carnage.
The Gorkamorka spells are as unpredictable as a Squig on mushrooms:
Foot of Gork stomps nearby enemies for D3 mortal wounds on a 2+, and reduces their charge rolls by 1.
Gork-Roara gives friendly units within 12″ +1 to charge rolls if they roll any 5+ on up to two dice, but every 1 or 2 rolled it will instead deal 1 wound to the Shaman, so it’s a bit of a gamble.
Morkspit Marsh forces enemy units within 6″ to not run (like a Swampy Lifeguard?), and -3 to their control score. That can really swing an objective.
Or, if subtlety’s not your thing, you could just throw in a Krondspine Incarnate and let it munch its way through the battlefield. Gork and Mork would probably approve either way.
Man-Skewer Boltboyz
Painted by Peter
One of the most iconic, and possibly feared, units in the Kruleboyz arsenal, the Man-Skewer Boltboyz bring serious shooty menace to your swampy horde. With Middul Finger, we’re extending their reach by +3″, pushing their aimed shots out to a nasty 21″ threat range.
They’ve got two firing profiles:
Hasty Shot gives you +1 attack per model, great when you just need volume. Great for combining with Venom-Encrusted Weapons.
Aimed Shot, though, is where the real killin’ happens, you get +1 to hit, extra range, and +1 Rend. And both profiles pack Crit (Auto-Wound), so any 6s to hit go straight through to the save step with 2 damage each.
For a truly nasty surprise, slap Venom-Encrusted Weapons on them when your melee units aren’t tied up elsewhere. That’ll give them mortal wounds on hit rolls of 5+ meaning you’re suddenly fishing for deadly crits at range, and trust us, it’s as fun as it sounds (for you, anyway).
Skaregob Totem
Credit Games Workshop
Right now, it’s mostly for your Swampcalla Shaman, but the Skaregob Totem is a smart pickup, especially since it’s free in points (though not in real-world coin, sadly… that’d be too generous even for Gork). Once your army grows to 2000 points with more foot heroes, its value goes up.
If your Shaman is within 3″ of the Totem, he becomes a Shouty Boss, and while he’s shouting, enemies can only target the Totem with attacks, not him. It’s a sneaky little way to keep your Shaman alive while he stirs up trouble from the back.
It also boosts your Dirty Tricks game. Any trick that targets units wholly within 12″ of the Totem gets +1 to the roll, but if it’s got a Shouty Boss, that range jumps to 18″. So yes, park your Shaman next to it and let the grotty magic flow.
Basically, it’s a loud stick that makes your tricks trickier and your wizard harder to squish. What’s not to love?
Key Points
Squishy as Swamp Slop: Most of your units (except the Killaboss on Gnashtoof) have a humble 5+ save, so they’ll crumple if you sneeze on ’em wrong. Avoid fights you’re not confident of winning, and stay clear of missile units when possible, cover and clever positioning are your best mates.
Use Venom-Encrusted Weapons Every Turn: No excuses. This is your core damage buff. Fishing for mortals on a 5+ turns even the weediest unit into a real threat.
Boost Saves Where You Can: Whether it’s Foul Elixirs, a spell, or Mork’s Eye Pebble, any extra survivability helps, especially if a unit’s about to get lit up by ranged attacks.
Mork’s Eye Pebble: Hold it until you’ve got multiple units under threat, but if it’s the final turn and it’s still unused, pop it anyway. A last-minute Ward can save the day.
Dirty Tricks Are the Best Kind: These aren’t just fun, they’re tactical gold.
Sneaky Sneakin’ can help grab distant objectives (and perfect for tactics like Take the Flanks) or keep your units clear of the enemy’s nastiest hammer. Note: It’s been FAQ’d so it only works in your movement phase now, don’t trust any old physical cards you have — booo! No more enemy movement phase shenanigans.
Noisy Racket: Got a fight you’re unsure about? Drop this to make an enemy unit Strike Last. Great in a pinch or to swing a multi-combat in your favor.
Lethal Surprise: Don’t forget this if you’re getting charged, if it goes off the enemy takes D3 mortal wounds just for showing up. Classic Kruleboyz hospitality.
WHAT NEXT?
There are a few great directions you can take from here, depending on whether you want to double down on the swampy foot-sloggers or bring in some proper monsters to mix things up.
Personally, I’m a fan of adding a big beastie, something like a Snatchaboss on Sludgeraker Beast or a Mirebrute Troggoth. Both bring serious punch, some resilience, and that lovely intimidation factor.
If you want to stick with your infantry-focused theme, adding another unit of Gutrippaz is a solid call, especially since you’ve likely got enough Man-Skewer Boltboyz already. More bodies means more objectives covered, more chances to trigger synergies, and more tools for your tricks.
That said, some recent tournament lists have gone in a different (but effective) direction, using speed as the key:
Kragnos
Corpse-Rippa Vulture
Monsta-Killaz
Hurtlin’ Hogz Regiment of Renown
Whatever direction you choose, make sure it fits your playstyle, whether that’s stomping across the board with beasts or skewering your foe from afar.
I’ve had the itch to start a Soulblight Gravelords army for ages (honestly), and it turns out the undead are very patient. While I’m more of a painter than a player, this time I’m looking to change that. My goal is to raise not just beautifully (hopefully) painted miniatures from the dead, but also my gaming skills. From Grave to Glory, this series will follow my journey from the humble beginnings of a Spearhead box to a fully fledged Soulblight force, and maybe even a few victories along the way (I can dream).
I’ve decided to start with the older Soulblight Gravelords Spearhead box. Yes, the one that’s vanished from the Games Workshop store like a vampire at dawn but still lurks on various third-party sites. I chose it over the newer box because, quite simply, it offers more bite for your buck.
Here’s what’s inside:
1x Vampire Lord
20x Deathrattle Skeletons – The backbone (literally) of the force.
5x Blood Knights
3x Vargheists
Theme: “Death’s Season”
This army will be steeped in the decay of autumn, when the leaves fall, and the dead rise. Think dusty orange-browns for cloaks, dark mouldy green for armour, sickly yellows for banners, and green magical glow effects. The bases will be littered with autumnal detritus: leaves, browns, ochres, and just a touch of rot.
Bits & Bones
I’ve not actually got had the opportunity to paint minis yet, but I’ve used dreaded AI to come up with a few possible themes that may work.
The one that really caught my eye, but perhaps with more a green tint to the armour.
WIP on replicating the scheme
The tunic is a 1:1 mix of Steel Legion Drab and Wild Rider Red, aiming for a worn, autumnal orange-brown. The armour started with Castellan Green and was drybrushed with Runelord Brass to give it a weathered, aged-metal look. The banner is a 50/50 mix of Steel Legion Drab and Fire Dragon Bright. I’ll be adding a design and some glow effects to the eyes next. All the wood and leather were done in Rhinox Hide for that deep, earthy tone. I hope this all comes together for a rich, autumn-season vibe. Though I think the tunic could be a little darker.
Next Steps:
Over the next month, my plan is:
Paint the entire Spearhead to tabletop standard (or better, depending on how much the vampires drain me).
Get some games in, hopefully with actual living opponents.
Reflect on gameplay and look at which models (or playstyles) I might want to expand into as I build towards a 1,000-point list.
Games Workshop (Warhammer) may have dropped a hint about a new format in 4th Edition Age of Sigmar.
A new boxed set along the same lines as a Vanguard box has been announced for the Stormcast Eternals, Spearhead: Stormcast Eternals.
Inside the box you get the following:
LEADERS Yndrasta (260) Knight-Vexillor with Banner of Apotheosis (140)
BATTLELINE Vanquishers (100) Vanquishers (100)
OTHER Annihilators (150) Stormstrike Chariot (150)
TOTAL POINTS: 900/1000
NB: Thanks to Xander Bennett for highlighting there were 10 Vanquishers, not 5 and that the Knight-Vexillor comes with the Banner of Apotheosis
I don’t think it’s a massive step to assume that these boxes may in time replace the Vanguard boxed sets.
I think what may be happening is that Games Workshop are building on the very clever box to battle format of Combat Patrol in Warhammer 40k and bringing that to 4th Edition Age of Sigmar. Perhaps this will also include unique rules for each Spearhead box once it’s released to balance them against each other?
Judging by the points in the box, 900 in the current Battlescroll, the points look roughly to be close on 1,000. So this may even mean we’ll see boxes for the likes of Sons of Behemat.
Kruleboyz are one of the few armies which enjoy dishing out mortal wounds in buckets. It’s also the one Orruk army which enjoys a tonne of shooting attacks. They are a glass cannon however, and suffer from the odd breeze. They lack any serious screening but enjoy a surfeit of monsters that both dish out the damage and buff your troops attacks.
What’s in the Vanguard Box?
In the box you get:
Killaboss on Great-Gnashtoof
Murknob with Belcha-Banna
10 Gutrippaz
3 Man-Skewer Boltboys
1 Beast-Skewer Killbow
All for £85 at Games Workshop. Unless you wanted to buy it through our affiliate Element Games, in which case it would cost you £72.25.
The total points of these units under the current battlescroll comes to just 540 points, so we’ll need to buy a fair few more units to get up to the 1,000 point mark.
Next go and pick up the Age of Sigmar Harbringer Set, it’s great value and you’ll get the difficult to source Swampcalla Shaman as well as 10 more Gutrippaz and 10 Hobgrots to act as a screen. This brings us up to 870 points. For the final spend, pick up another set of 3 Man-Skewer bolt boys.
Your total spend through Games Workshop will be £215 (if you include the Orruk Battletome which you’ll need for the rules). But as mentioned, if you use our affiliate link with Element Games, you’ll get all of this for just £176.25 (including the Battletome).
Don’t forget though, you can probably get at least £20 back for selling the Stormcast half of the Harbringer box. So consider this 1k army as £150ish with the Tome.
OTHER 3x Man-Skewer Boltboyz (120)* 3x Man-Skewer Boltboyz (120)*
CORE BATTALIONS *Battle Regiment
TOTAL POINTS: 990/1,000 Wounds: 89 Drops: 1
First off, we’ve chosen Grinnin’ Blades to nullify your squishy army from getting popped outside of 12″.
We’re then wrapping them all up into a single drop Battle Regiment. In theory this should give you control of the first turn. If you’re facing another ranged army like Kharadron Overlords or Lumineth Realm-Lords this can mean you actually opt to give them the first turn, force them to move closer but stay outside of their ranged attacks, then on your first turn have your Man-Skewers and Killbow take down some fools. If you’re lucky you may even get th priority into the second turn…
The Units
Killaboss on Great Gnashtoof
Killaboss on Great Gnashtoof Painted By Woehammer Peter
This fella is great, and it’s a model I personally love. With a 10″ move, he’s not particularly fast, so we’ve given him the mount trait Fast ‘Un to get that one extra hero phase move. Meaning, in theory you could potentially pull a move and charge off against an enemy 27″ away.
Rather than the traditional Supa Sneaky you often see on a Kruleboyz warboss, we’ve gone for Slippery Skumbag. This is to maxmise the Savage Hound ability which gives the unit +1 to its hit rolls if it made a charge in the same turn. This means if you’re locked in combat, you’ll be able to retreat out, and then charge once more in the same turn.
Swampcall Shaman and Pot Grot
Painted by Woehammer Peter
This guy is going to be key to maximising the amount of damage your units can kick out during the battle. Using his Poison ability means that the unit you buff will cause mortal wounds from their venom-encrusted weapons on a 5+ instead of the usual 6+. During the early stages of a game, you’ll want him giving poison to your ranged Man-Skewer Boltboyz. Follow this up late game with the Gutrippaz when they make combat and watch the colour drain from your opponent’s face.
We’ve also given him the spell Nasty Hex, so if you do come up against any armies with ward saves, he’ll have a chance of turning them off before your Poison enhanced units pick them apart.
As a last little gift, this guy will sticking close to either your Man-Skewer Boltboyz or your Gutrippaz, so we’ve given him the artefact Mork’s Eye Pebble. Meaning once per game in a single phase, the Swampcalla Shaman and all units within 12″ will have a 5+ ward save. Not bad for a bit of extra survivability.
Murknob with Belcha-banna
Credit: Games Workshop
Under the current General’s Handbook (Season 23/24), this model has improved in value. With the amount of Wizards now able to cast various spells without too much difficulty, it helps to have a source of ward saves against them. Make sure you keep him near your key damage dealers like the Gutrippaz and Man-Skewers so they benefit from that 5+ ward save against spells.
On top of that he can dish out some mortal wounds alongside the Gutrippaz with the Breath of the Mire-drakes ability. Just don’t rely on it too much.
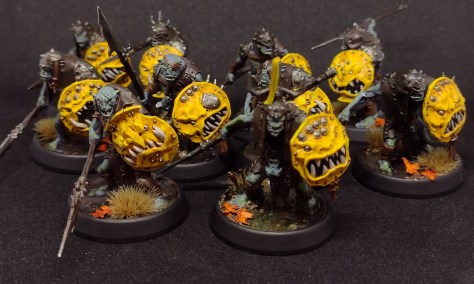
Gutrippaz
Painted by Woehammer Peter
I hope your woman loves you like Woehammer Pete loves Gutrippaz
It’s true, I love these guys. I’ve found so many times that people underestimate the amount of damage that they can kick out (that’s why I have a list with 60 of them…).
With Poison from the SwampcallaShaman a unit of 10 of these boys they dish out the following damage on average:
v Save
Gutrippaz (Wicked Stikka + Poison)
2+
7.29
3+
7.58
4+
7.88
5+
8.17
6+
8.46
–
8.75
At only 150 points a unit, they’re great. Their downside is their lack of bravery, but this can be compensated for by the Killaboss on Great Gnashtoof‘s ability All Part of Da Plan.
Hobgrots
Painted by Woehammer Peter
These are here as a simple screen, but to be honest they’re not even too great at that. They won’t stick around and they won’t do too much damage. They’re not bad for protecting your Man-Skewer Boltboyz and Beast-Skewer Killbow, or for claiming home deployment area objectives. But otherwise don’t expect a great deal from them.
Beast-Skewer Killbow
Painted by Woehammer Peter
It’s a lot cheaper than it used to be, but don’t expect great things from it. Really, it’s only use is against multi wound monsters and even then you have to pray that it hits. IF it hits, and IF you roll a 6 on that to hit roll, you’ll be laughing though as every wound caused will be mortal…
Man-Skewer Boltboyz
Painted by Woehammer Peter
These are your early game damage dealers while the enemy struggles to get to grips with you. Get the Poison on them from the Swampcalla Shaman and fire at long range at first. If you have your target within 12″ though, make sure you shuffle them to ensure you’re using the hasty shot. Doubling the amount of shots means you’re fishing for those all important 6’s for the mortal wounds (5’s if you’ve given them Poison from the Swampcall Shaman).
As an idea as to what just 3 can do in terms of damage:
v Save
Aimed Shot (+Poison)
Hasty Shot (+Poison)
2+
3.56
5.19
3+
4.00
5.44
4+
4.44
5.70
5+
4.89
5.96
6+
5.33
6.22
–
5.33
6.22
What Next?
When you’ve had a few games and you’re looking to expand your list up to 2k, I would seriously consider purchasing Gobsprakk. In the current meta with his Mork Sez No abilty and Primal Dice being able to enhance this he’s an absolute menace to enemy casters.
You may also want to look at getting a Snatchaboss on Sludgeraker, they’re beasts in combat and their Sludgeraker Venom means that the venom-encrustd weapons of any units nearby will be causing one additional damage each. That means your Gutrippaz could be causing 2 damage and your Man-Skewer Boltboyz 3 damage.
Most lists also run 2 Swampcalla Shamans to maximise the Poison output. If you also like running lots of Gutrippaz, I’d consider buying a Killaboss with Stab Grot or two for the bravery benefits.
With the release of Warhammer 40k 10th edition, what better time to refresh our beginners’ starter armies based on the Combat Patrol boxes?
Warhammer 40k Orks Combat Patrol
The Combat Patrol
What do you get in the Ork Combat Patrol? The full list of units are:
Ork Warboss in Mega Armour
20x Ork Boyz
3x Deff Koptas
1x Deff Dread
This comes to 530pts in the new rules, and don’t forget, this will count as an army in its own right when you’re playing the Combat Patrol mode of Warhammer 40k. But what do you buy when you want to start playing larger games of 1,000 points?
Here’s one suggestion that Woehammer have come up with….
Meganobz (165 points) • 5x Kustom shoota 5x Power klaw
What You’ll Need:
Combat Patrol: Orks
2x Ork Warbosses
2x Ork Meganobz
3x Trukks
How Much Will it Cost?
If you’re in the UK you can get everything you need through our affiliate Element Games. Through Games Workshop this army would cost £322.50, but via element Games you’re saving over £40.
If you’re in the US, you can save roughly the same amount via our US affiliate Not Just Gamin’..
Big Mek in Mega Armour
Credit: Games Workshop
We’ve dropped the original Warboss in Mega Armour that came with the Combat Patrol in favour of the Big Mek in Mega Armour. Why? Have a quick look at some of his abilities, then take a look at those Meganobz we’ve included.
Courtesy of Games Workshop
So he can sit with Meganobz, and while he’s with them, he’ll give them a 4+ invulnerable save to ranged attacks. On top of that, once per game, he can bring back 1 Meganob in each of your command phases.
Thanks to the grot oiler, you can also heal back D3 wounds to the Mek once per game.
This fella can do a fair amount of damage himself when you give him either a killsaw or a power klaw. The latter is the more reliable option. He’ll rip through those beakie boys with no problem.
Warboss
We’ve got two of these to go with each of our units of Boyz. These are great with our Boyz as these fellas five them a +1 to hit on their melee weapons.
Plus, they are no slouches in combat themselves. Just the Big Choppa along comes with 5 attacks hitting on 2’s at strength 8, -1 arour penetration, and 2 damage each. But call a Waaagh! when they’re both in combat, and you’ll be adding another four attacks to that profile, and that’s all thanks to their ability ‘Da Biggest and Da Best‘! They have a 4+ save and a 5+ invulnerable save as well, so take a little bit of focus to get shifted from the board.
Meganobz
With a 2+ save and toughness 6, these boyz can soak up a fair amount of damage, then add to that the Big Mek who’ll give them a 4+ invulnerable to ranged attacks. They become a force to be reckoned with!
They’ll be equipped with Killsaws or Power Klaws, with high strength and high rend they’ll rip through most enemy units without too much difficulty. You’ll find they’ll be a big target for your opponent. Which is fine, as long as they’re trying to kill them your other Boyz can roam around take objectives and do their thing.
Boyz
Ork boyz are toughness 5 and two wounds each with a 5+ save, which isn’t too shabby, but to be on the safe side, we’ve put all out units in Trukks for a little more protection and to get them round the board a little faster.
Hopefully, your opponent will focus on ridding themselves of the Meganobz and don’t feel too worried about the Boyz. Giving you a chance to get them into combat and start krumpin’.
A standard choppa on a boy is 3 attacks, 2+ to hit (thanks to having a Warboss attached to the unit) and strength 4. The volume of attacks from 10 boyz will rid you of roughly three of Marines in combat. Calling a a Waaagh before you start krumpin will give them an extra attack and an extra pip of strength as well, meaning the three dead marines we had earlier increases to five or maybe even six! You could even spend a command point on Unbridled Carnage, meaning every 5+ hit roll scores a critical hit.
If they’re going up against a particularly deadly opponent in the combat phase, perhaps spend a couple of command points on Orks is Never Beaten, this will allow your Orks to essentially still make their attacks against that unit, even if they die!
Don’t forget, when you call the Waaagh, you’ll be benefitting from a 5+ invulnerable save as well.
To make them even tougher in combat why not spend a command point and give them the stratagem ‘Ard as Nails? With that, the opponent will have to deduct one from their wound rolls when attacking them.
Trukk
We’ve three of these for each combat group. Give them a wrecking ball for the funsies. 10 Wounds and toughness 8 with a 4+ save and 6+ invulnerable. They won’t survive focused fire, but they’ll do, especially when they’re only 50 points.
If it does get destroyed while carrying your precious boyz into battle, you could spend a CP on Careen! The Trukk can make a normal or fall back move before the boyz inside make an emergency disembarkation, meaning you could get them even closer to the enemy before the Trukk is destroyed.
Deffkoptas
These are perfect to take pot shots at the enemy and harass them as they move around the board. The kopta rokkits are not bad, but don’t expect them to do too much damage. They’ll be great for picking wounds off units from a far or for popping wounds off light vehicles.
With Deff from Above, you can select one enemy unit you flew over that turn as well and roll 1d6 for each model in the unit. On a 4+ they’ll get a mortal wound.
Deff Dread
This boy won’t be able to keep up with the rest of your force, but he’ll be good to protect the backline objectives from anyone who’s foolish enough to stray to close. I’d be tempted to give it a couple of Rokkit Launcha’s so that it can join in the fun from afar and pick wounds off some of the tougher units in the enemy force.
Following on from Danny and Phil’s excellent chat about the new Slaves to Darkness Battletome, we thought it would be great to give you an option for a beginners army based on the new Vanguard: Slaves to Darkness.
Vanguard: Slaves to Darkness
This new boxed set priced at £85 through Games Workshop comes with 17 models in total to give you an (almost) complete beginners army. I say almost, the total points in this set amounts to 680 points.
Included in the box you have:
1x Chaos Lord (115 points)
10x Chaos Warriors (220 points)
5x Chaos Knights (230 points)
1x Gorebeast Chariot (115 points)
But we want a full 1,000 point army that we can start playing with, so to add to the above I’d possibly look at buying a Chaos Sorcerer Lord, a Darkoath Warqueen and a set of Darkoath Savagers.
What will it all cost?
Battletome: Slaves to Darkness £32.50
Vanguard: Slaves to Darkness £85
Darkoath Warqueen £21
Darkoath Savagers £35
That’s total of £173.50 at Games Workshop prices for everything you need to play at 1,000 points with Slaves to Darkness.
You can of course get these cheaper through your local retailers. Element Games in the UK offer between 15-25% off on these prices. Why not use our affiliate link below to start your army today?
The List
Army Faction: Slaves to Darkness – Subfaction: Host of the Everchosen
LEADERS Chaos Lord (115) – General – Mark of Nurgle – Reaperblade and Daemonbound Steel – Command Trait: Death Dealer – Artefact: Hellfire Sword(Reaperblade) Chaos Sorcerer Lord (120) – Mark of Nurgle – Lore of the Damned: Daemonic Speed Darkoath Warqueen (100)
BATTLELINE 10x Chaos Warriors (220) – Mark of Nurgle – Murderous Weapons – Retinue 5x Chaos Knights (230) – Mark of Nurgle – Cursed Flail – Ensorcelled Banner: The Eroding Icon 10x Darkoath Savagers (100)
OTHER 1x Gorebeast Chariot (115) – Mark of Khorne – Lashing Whip & Chaos War-Flail
TOTAL POINTS: 1000/1000
This army is tough! and it has fast elements which can also pin units in place while you bring your Chaos Warriors and Darkoath Savagers to bear. We’ve gone for Host of the Everchosen as our subfaction, this will allow us to bring back slain models on 5+ instead of 6+ with our rally ability. This only applies to the Chaos Warriors and Chaos Knights, but these two units with the Mark of Nurgle are already going to be blighters to shift anyway, this will just make it even harder for our oppposition!
How it could play
Chaos Lord
Our general for this particular list. He’s tough and hits like a hammer. Giving him the Mark of Nurgle means the enemy have to subtract 1 from their wound rolls that target him when using melee weapons. It also gives him the ability to use the Command Ability: Bestow Contagion. This will allow our other Nurgle Marked units (Chaos Warriors and Knights) a chance to cause D3 mortal wounds to enemy units within 3″ on a 3+.
We’ve got Death Dealer as our Command Trait, and this will allow our General to fight for a second time in the fight phase once per battle. Admittedly it’s with the Strike-last effect, but even so, well worth having.
With Chaos Lords you’re also allowed to choose a retinue which you can pass wounds off to on a 3+ (the reasons for this shown in the Chaos Warriors section), for this I’ve chosen the Chaos Warriors, as really he should be sticking to them like glue throughout the game. The other benefit from being retinue is they can fight immediately after our Chaos Lord if they haven’t fought yet. Essentially giving you two fight activations for the price of one!
As an artefact, I’ve gone for Hellfire Sword, which will allow our Reaperblade to cause two mortal wounds for each hit roll of 6.
Giving him the Reaperblade and Daemonbound Steel does mean that the damage output is slightly better than that of the Daemonbound Flail when you also take into account the mortal wounds caused by Hellfire Sword:
Weapon
– Save
6+ Save
5+ Save
4+ Save
3+ Save
2+ Save
Reaperblade
2
2
2
2
2
2
Daemonbound Steel
1
1
1
1
1
0
TOTAL
3
3
3
3
3
2
Daemonbound War-Flail
2
2
2
2
2
2
Average Damage after Saves
Chaos Sorcerer Lord
This lovely fellow is a good buff to your forces. He’s a single cast and single unbind wizard which isn’t anything to write home about, but what he does provide is his spell Daemonic Power. With a casting value of 6 and a range of 18″ it should be fairly easy to cast each turn, and when you do you’ll be able to give ANY of your other units in this list +1 to hit and +1 to wound for their melee attacks. That’s nothing to be sniffed at!
As well as this he can give a 6+ ward to one of your other units in this list until the next hero phase. Hopefully you’re starting to see the tankiness of those Chaos Warriors now with their Mark of Nurgle (-1 to wound them) and a 5+ Ward Save against mortals and 6+ Ward against everything else.
Darkoath Warqueen
I absolutely love this model, which is mainly why I’ve chosen it (never discount rule of cool!). Like the Chaos Lord, this unit can allow the Darkoath Savagers to fight immediately after herself (as long as they haven’t already fought), another twofer!
She has an ability where if issuing the inspiring presence command while inside the enemy territory she can give it up to 2 Darkoath or Cultist units. We only have one for this list, but perhaps consider buying one of those awesome Warcry warbands when you look to expand to 2k?
Chaos Warriors
The first of our three battleline units. Keep these near your Chaos Lord so that they can benefit from the Retinue rule and fight immediately after the Chaos Lord in the fight phase.
With a 3+ save, a 5+ ward against mortals and a 6+ ward against everything else using the Chaos Sorcerer Lords Oracular Visions, AND the ability to have slain models return from the rally command on 5+, this unit is going to take A LOT of punishment before it goes away! In fact they would need an average of 72 damage from zero rend weapons to be allocated to them before saves, for the enemy to have a chance of destroying them.
By getting the Chaos Sorcerer Lord to cast Daemonic Power on them as well you’ll soon see their average damage output after saves is not to be ignored:
Weapon
– Save
6+ Save
5+ Save
4+ Save
3+ Save
2+ Save
Murderous Weapons
14
14
12
10
7
5
Murderous Weapons (Enemy Territory)*
21
21
18
14
11
7
*Chaos Warriors gain +1 attack while wholly within enemy territory
Darkoath Savagers
Another unit I absolutely love. These guys have an added benefit of causing mortal wounds on hit rolls of 6 when in combat. This is the perfect unit to try and take objectives with, because if you manage to claim one previously held by the enemy then this unit will get a 5+ ward save until the end of the game. They won’t stand up to much punishment though, so if you’re going to commit them make sure you can win!
Weapon
– Save
6+ Save
5+ Save
4+ Save
3+ Save
2+ Save
Darkoath Weapons
8
7
4
4
1
1
Average Damage Output after Saves
Chaos Knights
Another tanky unit. They also benefit from the 5+ ward save against mortal wounds. We’re also giving them Mark of Nurgle (who is Mark anyway?) so the enemy is at -1 on their to wound rolls.
These guys are quick as well, we’ve given our Chaos Sorcerer Lord the spell Daemonic Speed. This will allow to roll 3D6 for their charge rolls when within 18″.
We’ve also chosen to give these chaps The Eroding Icon Ensorcelled Banner, this will worsen the rend of melee weapons used against them by 1, making them even harder to kill!
You’ll want these guys quickly claiming objectives and tying up units you want to hold in place ready for your Chaos Warriors to pummel.
Weapon
– Save
6+ Save
5+ Save
4+ Save
3+ Save
2+ Save
Cursed Land (Charging)
8
8
8
6
6
4
Cursed Lane*
4
4
3
3
2
1
Cursed Flail*
3
2
2
1
1
0
Trampling Hooves*
3
2
2
1
1
0
TOTAL*
10
8
7
5
4
1
Average Damage Output
Gorebeast Chariot
Another flanker unit for our army. We’ve given this the Mark of Khorne which allows us to add 1 to the attacks of its melee weapons when it charges.
Don’t forget that at the end of the combat phase it can make a normal move even if still within 3″ of the enemy. If it does so, it can cross across models with wound characteristics of 4 or less as though it can fly. If you do so, pick a unit that this model passed over and roll a dice, on 3+ that enemy suffers D6 mortal wounds! You’ll probably do an average of 3 or 4 mortal wounds… And it only costs 115 points! Bargain!
Weapon
– Save
6+ Save
5+ Save
4+ Save
3+ Save
2+ Save
Lashing Whip
1
0
0
0
0
0
Chaos War-Flail
3
2
2
1
1
0
Crushing Fists
2
2
2
2
0
0
TOTAL
6
4
4
3
1
0
Average Damage Output
Where to go next?
Everything in this book looks cool and you certainly couldn’t go wrong by possibly buying a second Vanguard box! If not, have a look at the Varanguard and Chosen, both heavy hitting units if that’s what you like. There’s also a certain bloke named Archaon…
Following on from Danny and Patrick’s excellent Battletome review we thought it would be great to give you an option for a beginners army based on the new Vanguard: Disciples of Tzeentch.
Vanguard: Disciples of Tzeentch
This new boxed set priced at £80 through Games Workshop comes with 27 models in total to give you an (almost) complete beginners army. I say almost, the total points in this set amounts to 730 points.
Included in the box you have:
1x Magister on Disc of Tzeentch (145 points)
3x Screamers of Tzeentch (100 points)
3x Flamers of Tzeentch (190 points)
10x Tzaangors (175 points)
10x Kairic Acolytes (120 points)
But we want a full 1,000 point army that we can start playing with, so to add to the above I’d possibly look at buying a Fluxmaster, the Tzeentch Endless Spells and a Chaos Spawn (buy a couple, they can be summoned by certain spells).
What will it all cost?
Battletome: Disciples of Tzeentch £32.50
Vanguard: Disciples of Tzeentch £80
Fluxmaster £27.50
Tzeentch Endless Spells £27.50
Chaos Spawn £30
That’s total of £197.50 at Games Workshop prices for everything you need to play at 1,000 points with Disciples of Tzeentch.
You can of course get these cheaper through your local retailers. Element Games offer between 15-25% off on these prices and the total of this army would cost just £166.37 through their store. Why not use our affiliate link below to start your army today?
The List
Army Faction: Disciples of Tzeentch – Subfaction: Hosts Arcanum – Grand Strategy: Master of Destiny
LEADERS Magister on Disc of Tzeentch (145)* – General – Command Trait: Arch Sorcerer – Artefact: Spiteful Shield – Spell: Arcane Suggestion – Spell: Infusion Arcanum – Spell: Shield of Fate – Spell: Bolt of Tzeentch Fluxmaster (170)* – Spell: Unchecked Mutation – Spell: Blue Fire of Tzeentch
ENDLESS SPELLS AND INVOCATIONS 1x Burning Sigil of Tzeentch (50) 1x Tome of Eyes (40)
CORE BATTALIONS *Battle Regiment
TOTAL POINTS: 990/1000
Aside from the Acolytes and Tzaangors this is a quick army with all of the other units moving a minimum of 9″ per round. We’re also magic heavy in true Tzeentch fashion with the ability to use 6 spells from their lore and two endless spells. Movement and casting with your leaders will be key.
How it could play
Magister on Disc of Tzeentch
Our general for this particular list. He’s quick with a 16″ move which should be enough to both keep him out of combats you don’t want him to be part of, as well as keeping him range for casting one of his myriad of spells.
He’s a single cast wizard with the ability to cast two at the 17% risk of changing into a Chaos Spawn. I would only cast two spells with this chap if you’re on the ropes in a game, otherwise stick to one.
It’s not a great model for melee, so try and keep it out. That said if it is in combat then we have the Spiteful Shield which will cause two mortal wounds on an attacker if you make any save rolls of 6 in melee.
In terms of the spells this model knows we’ve given it the Arch Sorcerer command ability to give it access to two more spells for a total of four.
Bolt of Tzeentch will allow it to cause D6 mortals on a unit, Arcane Suggestion will allow you to debuff enemy units making them easier to wound or making it harder to attack for them. Shield of Fate will give one of your units a ward save. While Infusion Arcanum will give buffs to its own attacks in combat. Something for every eventuality and that’s not including the two Endless Spells we’ve picked.
Fluxmaster
This “chap” comes with his own Arcane Tome ability which, once per style will allow you to re-roll one casting roll for this unit, it also allows you to add 3 to that casting roll when you do so. For its spell I’ve chosen Unchecked Mutation to go alongside its Blue Fire of Tzeentch.
Blue Fire of Tzeentch is particularly tasty, rolling nine dice for an enemy unit within range. For each 5+ roll that unit suffers 1 mortal wound and your force gains 1 Fate point. Unchecked Mutation causes D3 mortal wounds on a unit and if that successfully removed a model then you cause an additional D3 mortals.
As with the Magister you’ll ideally be keeping both of these characters out of combat and casting as many spells as you can to raise fate points. You should be able to manage two or three Fate points per turn giving you an opportunity to summon units at around turn three or four.
Tzaangors
As mentioned, these and the Acolytes are the slowest units in your force. That being said, both units are still movement 6″…. And they can run and charge in the same turn. If they do charge then each model can add 1 to the number of attacks they make with their beaks. This doubles those attacks from 10 to 20!
If you have 10 of these all with paired blades you’ll find they’re kicking out 30 attacks at 3+/3+/-/1 giving you on average a damage output (along with their beaks) of 16 before any saves (19 on the charge). That’ll remove some lighter units in a single turn. With both these and the Acolytes you’ll want to work in concert with your magic to make sure you’re removing the units you need to remove in order to win, as damage output is not the best with Tzeentch.
With the amount of damage this unit has the potential to do, it makes it your hammer. Tie up units with the Acolytes or Screamers then pile these boys in to bring them down.
Kairic Acolytes
Coming with Sorcerous Bolt at 18″ range, this is your only unit with any ranges firepower. Hitting on 4+, and wounding on 3+ with no rend (but this can be improved to -1 through their own spell) and only a single point of damage they aren’t Sentinels. They do an average of 3.3 damage at range and so make perfect units to chip damage off lightly armoured enemy.
They are classed as a wizard (with a +1 and so can cast a spell and also unbind in each hero phase. A lot of the time you may be improving the rend of their Sorcerous Bolts, but that’s good, as any successful spell can generate you a summoning point for more units!
Get them as near to enemy casters as possible, as each time they successfully cast near this unit they’ll suffer a mortal wound on 4+.
Finally, this unit has the option to take three models with shields. These shields give you a ward save of 6+ so remove these after you’ve removed other models to keep your ward save going.
Screamers of Tzeentch
These are quick, and they can dish out mortal wounds as well. With a 16″ move, if you use the movement to go over another unit you’ll cause mortal wounds to that unit on 4+ for each Screamer. Meaning on average you’ll score one to two mortal wounds. This is great for perhaps adding some chip damage to a hero or for whittling down an enemy anvil unit.
Once in combat they’re ok but not great. Causing on average 4 damage at rend -1. They’re better for harassing the enemy and using the pass over skill to cause mortals. Also use them to capture objectives quickly.
Remember to use Locus of Change if these are in combat and within 12″ the Fluxmaster as enemies will suffer a -1 to hit against them.
Flamers of Tzeentch
Another fairly decent ranged unit. It’s 18″ attacks should cause on average 6 damage (8 if the target has 5 or more models) before saves, which isn’t to be sniffed at. They’ll wipe small cheap screens like Hobgrots with ease.
If you summon an Exalted Flamer, be sure to place it near to these chaps to give them +1 attack each. That’ll push their average damage before saves up to 10 if they target a unit with more than 5 models.
Like the Screamers, they’re fairly fragile in combat so keep them out of it unless absolutely necessary or you need to finish off a unit. Take advantage of their ranged attacks.
Like the Screamers, remember to use Locus of Change if these are in combat and within 12″ the Fluxmaster as enemies will suffer a -1 to hit against them.
Other Notes
We’ve included two Endless Spells in this list. The first being the Burning Sigil of Tzeentch. This spell cause D3 mortal wounds to enemy units within 9″. If this is successful, then you also get to drop a Chaos Spawn model within each unit that suffered a casualty from this spell. Chaos Spawn‘s can be great to pin down units that are causing you problems as they’ll heal ALL their wounds if there is a friendly wizard within 9″ of them that successfully casts without their spell being unbound. They won’t stick around long as they’re only five wounds with a five plus save, but they’re worth it, especially if a spell is giving them out for free.
The second Endless Spell is the Tome of Eyes. Which when summoned will follow its caster around allowing them to re-roll their casting rolls. It also gives the caster access to yet another spell, The Parchment Curse, this will allow you to cause D3 mortal wounds to an enemy unit within 18″ of the caster on 3+. For each model slain by this they have to subtract 1 from their bravery for the REST OF THE GAME.
As Disciples of Tzeentch a wizard in your army can automatically cast a spell (the enemy doesn’t get an opportunity to unbind) that summons one of your Endless Spells. As this happens before the first Hero Phase it may be better to cast the Tome of Eyes to give the casting benefits to your caster in your first Hero Phase.
The other key thing to remember with Disciples of Tzeentch is that you can automatically unbind a spell with one of your Wizards in the first, third and fifth battle round thanks to our subfaction Hosts Arcanum.
You also have access to Destiny Dice where you roll nine dice at the start of the game and place them to one side. These dice can be used to replace a roll you have made for:
Casting Rolls
Unbinding Rolls
Dispelling Rolls
Run Rolls
Charge Rolls
Hit Rolls
Wound Rolls
Save Rolls
Rolls that determine the number of attacks or damage of a weapon
Battleshock Rolls
Remember to keep track of your Fate Points! You’ll get a Fate Point each time you successfully cast a sell that isn’t unbound. You can use Fate Points to summon units into your army. Once at 10 (which is the minimum needed to summon) you’ll have enough to bring either 3 Screamers of Tzeentch, 10 Brimstone Horrors or 10 Blue Horrors onto the table.
The army should be a lot of fun, especially if you like dominating the Magic Phase.
Where to go next?
I’d possibly look at buying a few of the summonable units such as Blue Horrors and another box of Screamers.
You get great value for money from the Burning Chariot kit. This can be used to build a Fateskimmer and an Exalted Flamer, a Fluxmaster and an Exalted Flamer, a Burning Chariot and a Changecaster or a Blue Scribes kitbash and a Changecaster.
Either way you go, have fun and let us know how you do!
Back in the mid 90’s when I was first getting into Warhammer and wargaming in a big way there used to be an article called ‘A Tale of Wargamers’ in the White Dwarf. The premise was simple, each person had a budget of £25 and spent that each month on expanding their army.
I thought it would be great to try and do this again in the current day and age. But also, we’re making it even harder for ourselves! What if we approached this as though we had never bought any models, paints or brushes before?! As in, what should a complete beginner look at purchasing and where from?!
So, if you’re a beginner to Warhammer or in fact any wargaming system (not just Games Workshop), then you may find this series interesting and useful. For those a bit more long in the tooth, you may just find this plain entertaining!
The Rules
As there are a few members of the team taking part in the Tale of Wargamers from all corners of the globe we first had to agree the limits.
UK based members have £25 GBP
US based members have $35 USD
Australian based members have $65 AUD
Rest of Europe have €30
You can use independent retailers, Amazon (I wouldn’t, but you could….) or Games Workshop for your supplies of tools, paints and models. Preferably eBay should be avoided as prices can be difficult to replicate.
Anything that isn’t spent in one month can be carried over to the next. You CANNOT spend more than the budget allows.
Finally, purchasing 3D miniature prints from a vendor on Etsy or similar is fine, however, we are banned from using our own printers for his purpose.
Warhammer Fantasy and Oldhammer Players
If you’ve already got a large collection of miniatures but want to take part, then use the budget as normal and consider each set of 10 models/artillery or similar to cost £25 and a hero/character to cost £15. Then purchase the paints etc as normal. I.e. you have a set of 10 Trollslayers in your pile of shame. Deduct £25 from your budget and paint them up.
I’m not going to lie, we think it’s going to be tough, but it is doable! And don’t worry, none of us will be resorting to using PVA glue to stick our models together!
Want to keep up to date on everyone’s progress? Why not join our Discord, on there you’ll fine the Tale of Wargamers channel where we post our thoughts and musings throughout the month.